Pentax P-TTL flashgun sync
How to synchronise dedicated P-TTL flashgun with other (not dedicated)flashes? Well, if you want to use your Pentax flash (or other dedicated one: I use Metz) in P-TTL mode then you can't. My first trials I made trying to shoot a photo with Metz attached to my camera and other flash with attached optical trigger and they failed. The reason was simple: P-TTL uses pre-flash in order to let your camera check how much power is needed to light the scene and then fires second time and this second time shows on your photo. The 2 flashes are so fast one after another that you can't see it but your second flashgun (the one with optical trigger) fires at pre-flash, so basically only the light from one flashgun is visible on your photo. I hope it all makes sense :-)
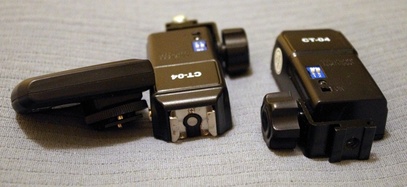
So after researching on the internet I decided to experiment with following items:
- optical trigger, which I had somewhere in a drawer,
- wireless radio trigger (1 sender + 2 receivers), which I bought on ebay for around £20 as far as I can recall and which were shipped from Hong Kong.
(These said items you can see on photos below)
So now my setup for my home studio is as follows:
- no of my flashes is in auto/TTL mode,
- camera has a wireless sender attached to flash mount,
- main flash (dedicated one) is in manual mode with wireless receiver attached to it,
- second flash in manual mode also with wireless receiver,
- third flash (used to light my white background) with optical trigger.
Now, when I shoot, my camera sends a signal to both flashguns with wireless receivers and they fire simultaneusly and because my main flashgun is in manual mode it doesn't fire pre-flash therefore the third flashgun (with optical trigger) can fire at the same time. Job done!
Of course because everything is in manual you have to make a few test shots to set everything properly. Our DSLR's LCD screen with preview is of great help here. Good starting posistion would be:
- camera settings: ISO200, 1/60s, f8
- main flash: let's say 1/2 power,
- assisting flashgun: lower power than your main,
- flash on background: let it go on full power and see.
If your all flashes give you an option to control their power it's easier to set them up but this website is about photography on budget so my other 2 flashes are ancient/cheap ones and don't have this functions. You can however reduce power of these flashes i.e. by moving them further from your object or, as I do it sometimes, covering them with some white tissue paper or printer paper (the more of it the less light of course).
My configuration presented here is not the only one that would work. I had the optical trigger already at hand and wanted to accomodate it hence I bought only 2 wireless recievers. You can do without the optical one and use 3 receivers.
And you can share your ideas if you wish so I can learn something new :-)
Be wary however whenever you use any old (older) flash: never attach it directly to your camera as some of them can fry its electronics due to high trigger voltage. You can find on a internet websites that gathered voltage of various old flashguns so you can have a look. Here, for instance:
http://www.botzilla.com/photo/strobeVolts.html
Some of the effects of my actions you can see in my gallery.
© Copyright Photography on a budget 2011-2012 - All Rights Reserved
