Home photo studio setup
I'm gonna share how my home photo studio was set up in order take some portaits. My setup worked just fine, or at least sufficently, at that point of time. I have no dedicated room for my purposes so my lounge must suffice. Have a look at pictures below:
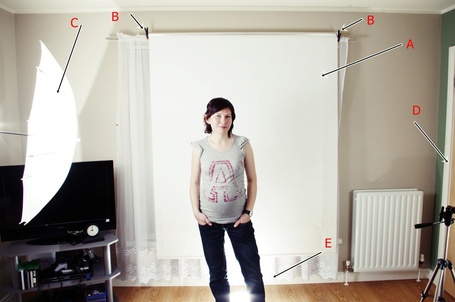
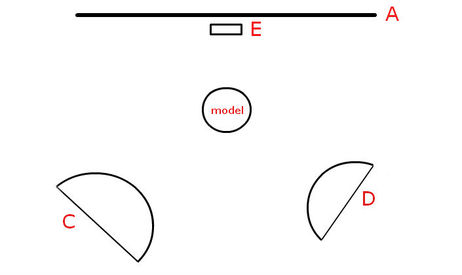
OK, the above drawing is not fantastic but at least will give you another dimension. Here it is what the letters mean:
A - a background. White wall would do just well but I didn't have any. What was used here was a window blind I had in store. Its size was 155cmx180cm roughly. It was too small for a "seemless white" backdrop and even wasn't pure white but rather off-white or cream colour but it did it's job. You will be able to shoot some knee-lenght portraits but you won't have enough room to allow your model to "prance about in her underwear" or do any kind of vigorous acting/posing. Unfortunately.
B - clamps. You can get them in any £1-shop. They are used to attach the background to a curtain pole
C - white translucent umbrella. The flash was shooting through the fabric (bought for £3-4 on ebay from exotic Hong Kong)
D - white reflective umbrella. The flash was bouncing from the inside of the umbrella (again bought for £ 3-4 on ebay from exotic Hong Kong) - edit: I recently purchased another translucent umbrella and use it here instead of reflective one
E - the weakest of all 3 flashes I have (bought for £4-5 on ebay from not so exotic UK mainland). I put it on a floor behind model facing towards ceiling and covered with improvised diffuser, namely A4 sheet of printer paper. It was to throw more light on the background to "bleach it" for a final effect.
You probably can't see it on these pictures but umbrella C is elevated and pointing slightly downwards from left, while umbrella D is lowered and pointing slightly upwards from right. The theory about power of your flashes is that your main flash should give twice us much light as the other flash, which function is to disperse shadows casted by your main flash. Now, theory is a good thing 'cos you know what to aim for, but reality is that I have no idea what
my flashes' power output will be and I don't have a light/flash meter (and have no intention of buying one) to check it. So what you're left with is tests and LCD screen of you DSLR to check your results. In my case I had 2 flashes I could set power on. Flash C was a fancy dedicated one and I could set its power to many values and flash D is old Hanimex TZ1 (bought on Ebay for a fiver) with 3 power settings: blue, manual and red). I ended up setting flash C to 1/2 and flash D was firing at its full power. But the settings depend also on the distance between umbrellas and model, and bear in mind you loose less light shooting through than by bouncing from umbrella. Anyway you need to try and test for yourself. Flash E was firing at full power slightly dimmed of course by the diffuser over it. If you need/want to reduce its power you can also cover it with 2 sheets of paper instead of one. I think though that the more the better in case of lighting your white background.
And that's it. I hope that my improvised home photo studio setup will work also for you .
And about how to synchronise your flashes in order to make them fire at the same time I'll tell in next episode, my wee bairns.
And kids, DO try it at home.
© Copyright Photography on a budget 2011-2012 - All Rights Reserved
